Correct installation of the tube in the CO2 cutter allows you to maintain the warranty and further, trouble-free use of the laser. CO2. Below we have discussed step by step how to mount a glass tube in a CO2 laser. For your convenience, we have also added an instructional video, in which we present the assembly in our device with two tubes.
Glass tube assembly - step by step
Step 1. Carefully unpack the tube from the packaging and remove the foam protection.
Step 2. Slowly place the tube on the yellow handles and position it approx. 10 cm from the mirror.
Step 3. Make sure the water inlet at the end of the tube points downward.
Step 4. Install the extension next to the mirror (this part is included with the tube).
Step 5. Close the handles - do not twist them.
Step 6. 4 white water lines are led out of the device. The pair is marked with a black tape.
Step 7. Use unmarked wires for the first tube. (Two tubes can be mounted on models with two heads, eg WS-CM, WS-BM and WS-TC for roll materials). Carefully insert the hose into the water outlet:
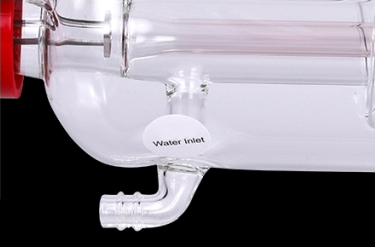
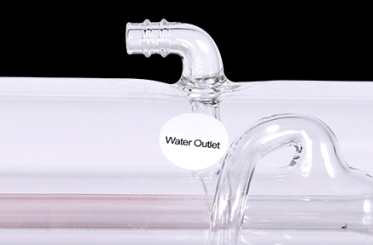
Water Inlet Water Outlet
Step 8. Install the pipe without the marking at the "water inlet" position.
Step 9. Twist the tube gently for better access.
Step 10. Attach the cable as in the previous step (remember to be careful, attach the cable to the end).
* Optionally, you can use plastic cable ties to hold the wire in position, but this is not necessary.
Step 11. At the end of the tube, screw the high voltage cable - white, with a red marking (try not to use too much force).
Step 12. Apply insulation
Step 13. On the other side (next to the mirror) screw the low voltage cable - green (also try not to use too much force).
Step 14. Rotate the tube to the starting position - the water inlet facing down, and the water outlet facing up.
Step 15. Tighten (until you feel resistance) both handles with the screws from the kit.
Step 16. On the handles, unscrew the two height adjustment locking screws (unscrew until you can turn the middle knob).
Step 17. Calibrate the height of the tube by unscrewing the central knob (the center of the tip of the tube must be in the center of the mirror).
* Be careful not to damage the water outlet.
Step 18. Read the value on the scale (about 140 cm) and set the other handle at the same height.
Step 19. Make sure! (measure the height of the handles again).
Step 20. In case of mounting the second tube: screw the handles with the central knob (the handle should be stable and stationary). Attach the second tube by repeating all the previous steps.
How can you tell when the tube is almost used up?
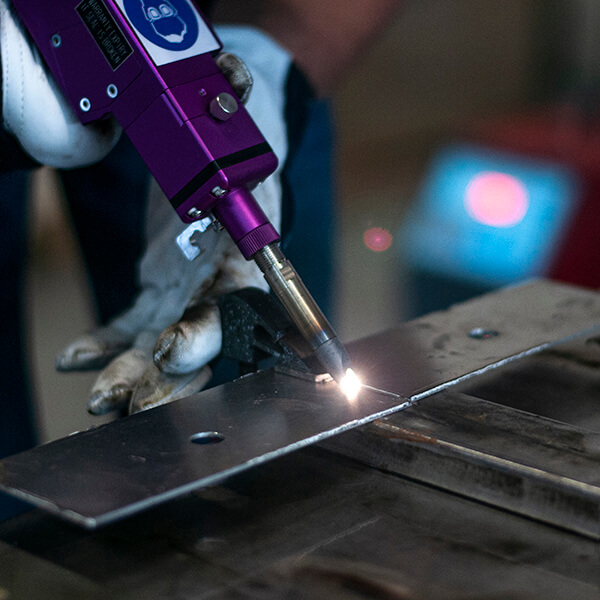
The normal color of the laser beam is purple when in use. When the tube is worn out, the color of the beam turns white. With 100% efficient optics (mirrors and lenses) and correct calibration of the laser beam, a decrease in efficiency in the form of uncut elements or poor engraving quality is noticeable. The laser tube effectiveness measurement service can also be ordered from our service technicians.
Where is the best place to buy a new RECI glass tube?
You can order a new RECI laser tube in our store: store.weni.eu or after contacting the Sales Department (Weni Solution accessories): tel. +48 791 942 530, e-mail: [email protected]
We offer RECI tubes:
Can the power of the CO2 laser be increased?
Yes, as long as the device can accommodate the larger tube size. In addition, you need to replace the power supply of the tube with a stronger one, which will allow for efficient operation with the full efficiency of the tube. Our website also provides services of this type.
Do you have a problem with replacing / installing the tube? Call our service!
We offer a service with access to the customer, but also remote assistance, both by phone and e-mail.
The cost of the service is available after contacting the Service Department.
Do you have any questions?
Contact us:
a) By e-mail: [email protected]
b) By phone: 77 433 71 30 (Mon-Fri 8-16: 00)
c) Through the form available on our website